30 day change of mind returns available
30 day change of mind returns available
Add description, images, menus and links to your mega menu
A column with no settings can be used as a spacer
Link to your collections, sales and even external links
Add up to five columns
Add description, images, menus and links to your mega menu
A column with no settings can be used as a spacer
Link to your collections, sales and even external links
Add up to five columns
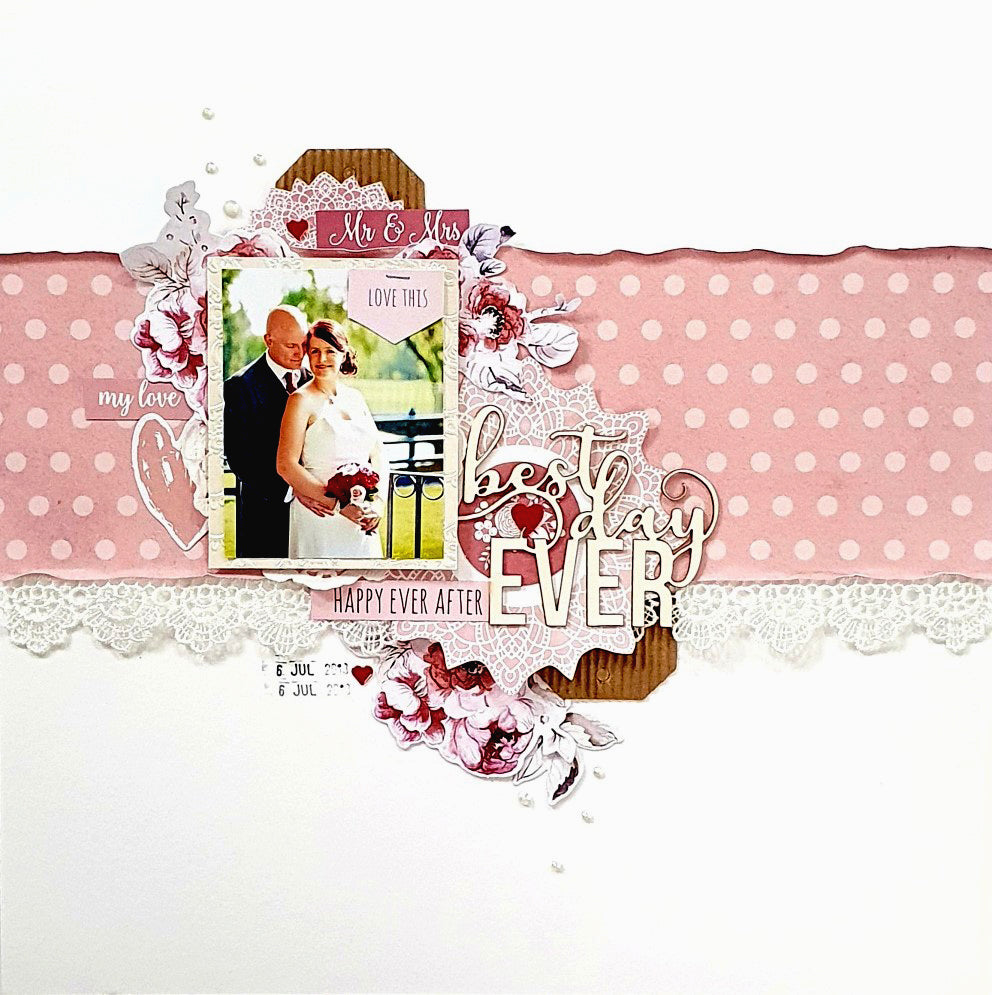
Best Day Ever - Tarrah McLean
January 31, 2021

Uniquely Creative Products Used
UCP2143 Adore, UCP2147 Carefree, UCP2148 Forever, UCP2149 Serendipity Creative Cuts, UCE1724 Crystal rhinestones, UCE1723 Napery embossing folder, UCE1807 paper doilies, Serendipity Cut-a-Part sheet, Watercolour cardstock, Kraft mini corrugated tags, Shimmer card, Metal Red Sticker Hearts, Muslin, Lace, Serendipity Laser cut
Other Products Used
Trimmer, scissors, ruler, double-sided tape, foam tape, glue, date stamp, black ink, stapler, staples, die-cut machine
Photo Size: 3.5" x 2.5"
Instructions
1. Trim the barcode strip from the Adore paper and then trim the paper down to measure 4" x 12". Place adhesive only in the centre of the paper and adhere this piece horizontally about 3" down from the top of the white watercolour cardstock base. Bend the edges of the paper to add some texture.
2. Trim a piece from the shimmer card to measure approximately 3" x 3.75" and emboss this piece with the Napery embossing folder and die-cut machine.

3. Adhere your photo to this embossed piece as a photo mat. Using a stapler, staple one of the banner pieces from the cut-a-part sheet to the top right corner on top of the photo.
4. Fussy cut out 2 doily shapes from the Carefree paper, 1 small and 1 medium size.

5. Take 2 of the Kraft mini tags and adhere one tucked into the top of the Adore paper approximately 3.5" from the left side and about 1.75" from the top of the cardstock base. Tuck the other one at the bottom approximately 3.75" in from the right edge and about 3.5" from the bottom of the white cardstock base.
6. Trim a strip of lace to measure 12" long and tuck in and adhere very lightly (we are going to need to lift this up to tuck things in) to the bottom of the Adore paper you adhered earlier.

7. Take the smallest fussy cut doily you cut out earlier and adhere this over the top of the Kraft tag at the top. Adhere the larger fussy cut doily approximately 3.5" in from the right and the same up from the bottom of the cardstock base. This one should overlap the lace border and the Kraft tag also.

8. Take one of the circle die-cut pieces and adhere to the centre of the large fussy cut doily.
9. Add craft foam underneath the shimmer card photo mat and adhere a paper doily underneath the photo and shimmer card in the bottom left corner.
10. Adhere your photo mat on top of the paper doily and fussy cut doilies leaving the sides free of adhesive while we add some die-cut flowers.
11. Take a large floral die-cut and lifting up the lace, tuck in adhere this piece about 4.5" in from the left side. Also take one of the small leaf die-cuts and adhere here also.
12. Take 2 more floral die cut pieces and adhere one tucked in under the top left corner of the photo and the other under the top right corner but slightly down the side of the photo.

13. Take one of the large heart die-cut pieces and adhere this piece tucked into the left side of the photo.
14. Adhere the Best Day Ever laser cut piece over the top of the large fussy cut doily, the ‘B’ in Best is flush with the right side of the photo and mat. The ‘Y’ in Day is about 3.5" in from the right of the cardstock base.

15. Fussy cut 3 phrases from the Forever paper. Adhere 1 above the photo at the top overlapping the small doily, adhere another on the left tucked in between the small floral die-cut and the heart die-cut and the last one adhere below the photo.
16. Lastly add 3 of the metal red heart stickers and some crystal rhinestones to finish. I also stamped the date stamp of when the photo was taken with black ink. Secure some embellishments on the layout with extra adhesive if needed.
Leave a comment
Newsletter
Join our mailing list and never miss an update …
